


sketchup linkedin assessment answers
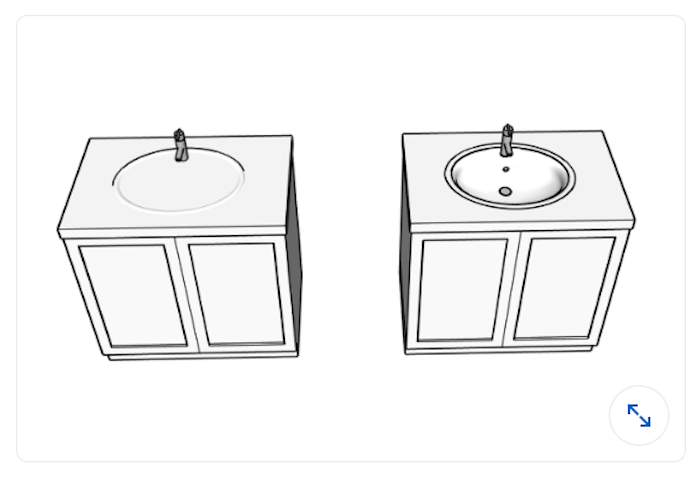
1. You are trying to cut an opening in a countertop that is the same shape as an oval sink, so that the sink bowl is visible. Which function would create this?
- JointPushPull
- Circle tool and Push/Pull
- Intersect Faces with Model
- Reverse Faces and Delete
2. You are creating a model of a small object for 3D printing. Because of its small size, you run into modeling issues. What is a possible fix for this?
- Work on the model in a file without any other entities in it so that the file size stays small.
- Be sure not to click and drag your mouse while drawing.
- Scale your model up (100x, for example), build it, and then scale it back down to the same ratio before printing.
- Use Zoom Extents to see your model more fully.
3. What function does the Zoom Extents tool perform?
- It centers your entire visible model in the viewport.
- It zooms to 400%.
- It allows you to zoom and extend an edge in the same action.
- It allows you to zoom in on a selected group.
4. Which image would work best when creating a model using the Match Photo function?
- an image taken at a 45-degree angle
- an image with one vanishing point
- an image with only one or two edges showing
- an image shot with a wide-angle lens
5. You are creating an entity that will repeat in your model multiple times. What should you do?
- Save it to the 3D Warehouse for later use.
- Save it to its own .skp file so you can reuse it.
- Make it a component.
- Make it a group
6. How would you move a group from an existing layer called Walls to an existing layer called Ceiling?
- Right-click the group and select Edit Group > Layers, and then use the drop-down menu and select Ceiling.
- Right-click the group and select Make Component. Then, in the component dialog box, select the Ceiling layer.
- Right-click the group and select Layers, and then use the drop-down menu and select Ceiling.
- Right-click the group and select Entity Info, and then use the drop- down menu and select Ceiling.
7. What is the Hybrid rendering option for in LayOut?
- It combines scalable vector linework with raster rendering for materials.
- It combines scalable vector linework with faster rendering speed.
- There are not any rendering options in LayOut.
- This option is used when there is more than one scale among multiple viewports on a page.
8. Where can you quickly find helpful hints and tricks while using tools?
- status bar
- Measurements box
- yellow dialog box
- Help menu
9. Which images work best to apply as a tiled (repeating) texture?
- photos of tile
- high-resolution photographs
- images with darker material finishes
- seamless images with no visible seams when tiled
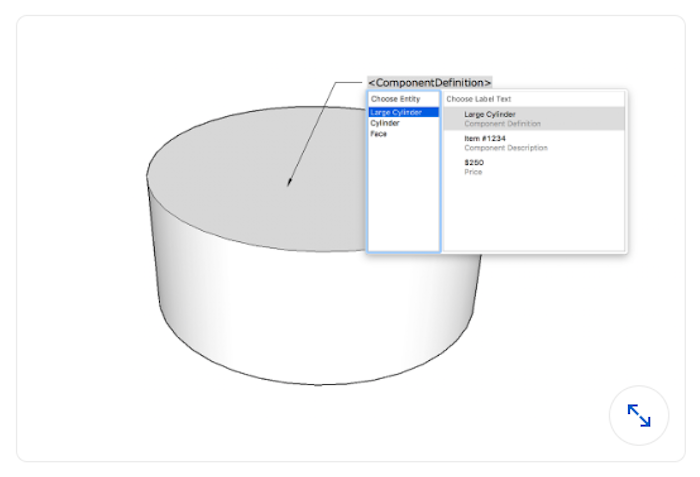
10. The image below shows the Label and Auto-Text function in LayOut. This data is added when the component is created. How can you edit the data after it is created?

11. How do you efficiently select all instances of a component in the model?
- Using the Select tool, hold down Ctrl (Option) and click each component in the Drawing window..
- Select the component in the Drawing window and then select Edit > Select > All Instances from the menu.
- Right-click the component in the Drawing window and select Select Instances from the context menu.
- Right-click the component in the Components window and select Select Instances from the context menu.
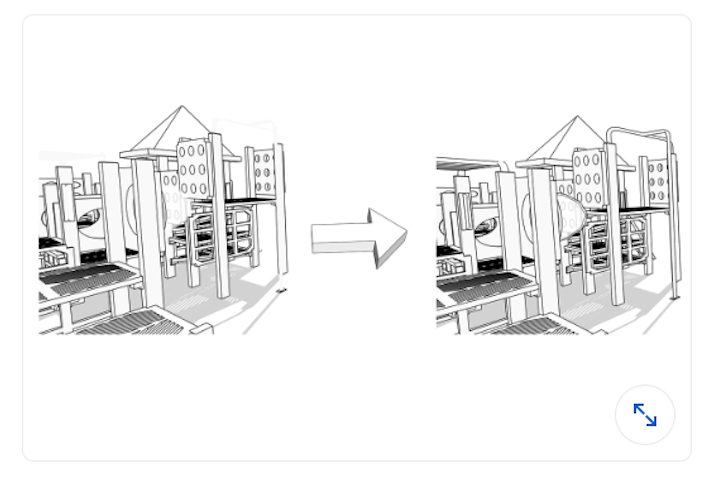
12. The drawing on the left has a hidden line style selected, but some of the information seems lost. The drawing on the right has the same style, but seems to be showing all geometry. What setting was changed to fix this?
- In the Styles window, select the Edit tab, click the Edges icon, and select the Profiles option.
- In the Styles window, select the Edit tab, click the Edges icon, and select the Edges option.
- In the Styles window, select the Edit tab, click the Edges icon, and select the Back Edges option.
- In the Styles window, select the Edit tab, click the Edges icon, and select the Depth Cue option.
13. When some faces are oriented correctly and others are not, what is considered the most efficient way to correctly orient all faces?
- Right-click a correctly oriented face and select Orient Faces.
- Hold the Shift key and select all backward faces, right-click the selection, and select Reverse Faces.
- Right-click each backward face and select Reverse Face.
- Select all geometry and choose Orient Faces.
14. The cube on the bottom is in one group and the cube on top is in another group. How can you keep them in two separate groups, but have them appear as one when not selected?

- Hide the bottom edges in the top group and the top edges in the bottom group.
- Offset the bottom of the top group and the top of the bottom group.
- Extrude both farther so that the geometry is overlapping.
- Erase the bottom edges in the top group and the top edges in the bottom group.
15. Which is not a function that the scroll wheel on a three-button mouse performs?
- Click and hold the mouse button, and add Shift to activate Pan.
- Click and hold the mouse button and the Spacebar to activate the selection addition function.
- Click and hold to activate Orbit.
- Roll forward and backward to zoom in and zoom out.


